![How to Build A Product-Led Onboarding Process: Go From User Activation To User Retention in 5 Steps [GUIDE]](https://cdn.prod.website-files.com/69661ac049df54e106bad94b/6967a754bc0e89b1b1f40e28_Product-Led-Onboarding.png)
TL;DR
- Use tooltips to help your user take action when they hover over a feature.
- Create user journey maps to plan and improve the typical user journey inside your app.
- Minimize friction for users to sign up. Eg, include Google email integrations for easy signup.
- Use your user persona data to create a personalized onboarding experience. Send onboarding emails and even welcome videos if you can.
- Set and measure different KPIs to improve your onboarding process. Some KPIs include Time-To-Value (TTV), User Engagement Rate, and Onboarding Completion Rate.
- Use product bumpers like empty states, checklists, and product walkthroughs to prompt users to using your product’s features during onboarding.
Product-led onboarding is one of the most important processes to master for any PLG SaaS company. But what does it mean, and why is it important?
Product-led growth, or PLG in short, is a go-to-market motion to grow your SaaS business. In PLG, the product itself is the center of the GTM strategy. It’s different from traditional strategies, where companies used to rely on old-school marketing & sales processes that required sales reps to be involved in the SaaS buying process.
All in all, consider product-led onboarding an important part of PLG itself.
“So why should I build my own product-led onboarding process?”
There are many benefits to creating a smooth product-led onboarding process – here are a few:
- Increases user activation
- Builds user trust & loyalty with the product
- Ensures qualified leads enter your lead funnel
- Improves trial-to-paid or free-to-paid conversion rates
- Relieves customer success and support teams from extra time & resources they spend on onboarding
That’s why in this guide, we will go through all the steps you need to take to create your own product-led onboarding from scratch using best-in-class industry frameworks and strategies!
Step 1: Define Your User Persona(s)
Right after you choose your onboarding strategy and roadmap, it’s time to create your user personas.
A user persona represents the target user for your SaaS product but with specific characteristics and problems in mind. A user persona helps to define your target user's pain points, desires, job roles, demographic details, and so on.
Here’s a checklist you can use to create different user personas for your SaaS business.
- What’s the user’s job title?
- What do they want to achieve? (Increase Feature Adoption? Decrease Churn?)
- What are their company’s details?
- Which market do they sell to? (Startups without good developers? Companies without a content strategy?)
- What are their biggest frustrations and pain points? (Tracking user behavior? Understanding technical data?)
- How can your product solve their biggest problems? (Helps to automate menial tasks? Speed up product activation?)
Answer these questions to build a solid user persona. That said, rather than random estimates, ensure these user personas are based on real customers. Ideally, it should be those with high ARPA (Average Revenue Per Account) and low churn.
Reach out to potential users by asking them questions and doing customer research – it’s a great way to validate your guesses so you can be certain you’re on the right track.
Put yourself in your user’s shoes and experience the product onboarding process. Is it too lengthy? Are you highlighting the benefits? Look out for any opportunities to minimize friction or potential confusion.
💡 Pro-tip: Have other team members try out the onboarding process before testing it out in the market. It’s a good idea to conduct customer interviews with other people who aren’t familiar with your product – this way, you’ll get unbiased perspectives and insights that you may have overlooked.
Step 2: Create a Seamless Onboarding Experience
One of the most crucial parts of any product-led onboarding process is guiding users to product activation and getting them to the ‘AHA’ moment as early as possible.
Including email integration features with Google or Microsoft helps to remove friction in the signup process. Many new users don’t like to put much effort into signing up, so this option often comes in handy.
But that’s not all – having a seamless product-led onboarding experience means having an onboarding flow that supports your user throughout their journey as well. Features like in-app support, customer email support, website chat support, and self-service tutorials are essential to any product-led onboarding process.
It’s also important to optimize for your First-Time User Experience (or FTUX, in short). This is when you guide your users on what next steps they should take to gain value from your product.
In short, you want to lead them toward product activation.
Here are a few ways to do that:
- Use tooltips or interactive guides to help your user take action.
- Personalize the onboarding process according to their needs (your user persona would help here).
- Create user journey maps to help create a seamless flow to product activation.
- Collect in-app feedback and improve accordingly.
The first impression is the last impression. Make sure your FTUX is well-optimized to make your user come back to your product every time.
Talking about the importance of simplifying the onboarding & signup process, Calendly has figured it out.
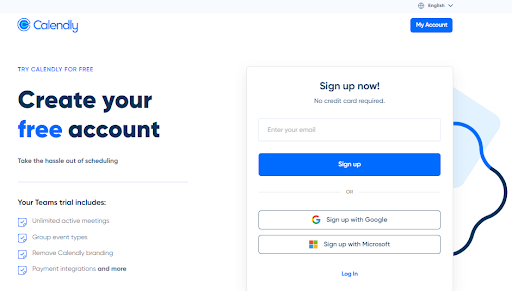
- Minimal signup options? Check ✅
- Google/Microsoft integration? Check ✅
- Reiterating the benefits of signing up? Check ✅
Remember: Optimizing an onboarding experience for PLG doesn’t mean you should completely eliminate your customer support & success team. They should be available to provide support and assistance to users to help keep them satisfied and engaged.
Step 3: Personalize the Onboarding Experience
Want to ensure your users don’t churn in the near future? Then personalizing your onboarding experience will play a critical role.
For starters, send a customized welcome message when you onboard new users. You can play around with this however you want. Try personalized welcome emails or even a video from the CEO welcoming the newly onboarded user.
The strategy is to make your users feel special – to make them feel that they’re not just customers looking to use your app but people you value as part of your community. The more valued they feel, the more loyal they’re likely to be (if your product also does the job for them).
Here’s an example from Userlist. The company personalized its user’s onboarding experience with a video from the CEO, Jane Portman, welcoming new users with a ‘thank you’ video.

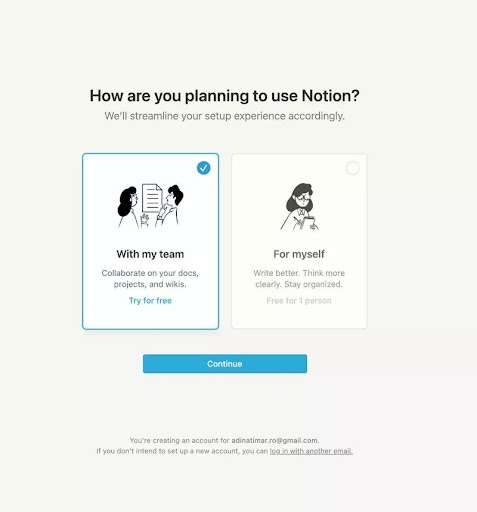
If your SaaS product has multiple personas, it’s important to have a customized onboarding experience for each persona.
Here’s a personalization example by Notion that you can use in your onboarding process.
Step 4: Support & Retain Current Users
Your user has successfully signed up and is starting to use your product. Now you need to get them to fully adopt your app and stick with it.
At this point, email your users and ask them about their onboarding experience. Be specific with your questions. Ask them to rate their onboarding experience on a scale of 1-10, and to include feedback about the process.
Try using these strategies to retain your users:
- Gather & study data on users who’ve churned.
- Create a forum or product community.
- Offer loyalty points, rewards, and exclusive offers.
- Give incentives if a user is about to terminate their membership.
- Create a referral program to encourage your active users.
- Work on everboarding your users by educating them on product updates, features, and how to utilize your product to the fullest.
You can also send feedback emails to ask your user about their onboarding & product experience, just like Thumbtack did here.
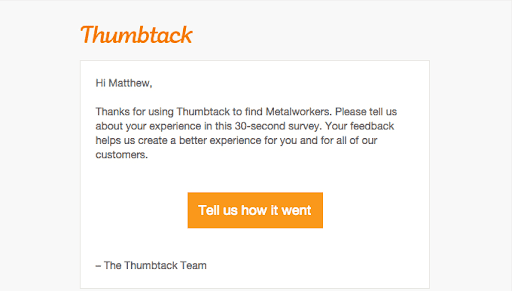
Sending such emails reminds your user of how much you value their feedback and opinions.
Step 5: Measure, Analyze, and Improve
You’ve successfully created your product-led onboarding strategy, made your user personas, simplified your signup process, personalized your user onboarding experience, and have got users hooked and stuck to your product. Great job!
Now it’s time for you to see how effective your onboarding process is – and you can do that by measuring your results. 🔢
There are hundreds of metrics when it comes to B2B app performance, but if you want to optimize your onboarding strategy, try to measure these:
- Trial Signups & Onboarding Completion Rate: Percentage of new trial users who completed their onboarding.
- Cohort-based Activation and Retention Rate: Percentage of users who continue to use your product over time.
- User Engagement Rate: Number of active users (compared to overall users) over a specific period.
- Time-To-Value (TTV): Time it took a user to gain initial value through your product (example: the time it takes for a user to create their first roadmap)
Take valuable input from your users and record both qualitative and quantitative data. Try to find loopholes in your product and analyze where you can improve. Experiment and see what works, and double down on those tactics.
Common Onboarding Tactics That Work: The Bowling Alley Framework
Every SaaS business has a different set of rules, systems, KPIs, and targets to achieve. So there isn’t a one-size-fits-all approach for a product-led onboarding strategy.
But, some frameworks are widely used in the SaaS industry, such as the Bowling Alley Framework.
The aim of the Bowling Alley Framework onboarding strategy is to turn current users into paying customers.
In a normal bowling game, you try to hit as many pins as possible to score the most points and eventually win. If your bowling ball ends up in the gutters, you lose – as simple as that.
What if you could avoid the gutters by blocking them through bumpers? So instead of losing points, you’ll secure more by the time you’re done.
Now use this example for the case of your product onboarding process.
The bowling ball is in your current state. The area of the 10 pins is the place you want to be.
The side gutters are now your bumpers – the Conversational & Product bumpers.

“So how can I use this framework to improve my user adoption rate?”
To do that, you need to perfect 3 things:
- Create Your Straight Line
- Develop Product Bumpers
- Produce Conversational Bumpers
Here’s a brief breakdown of how you can achieve all three:
The Straight Line
You know how you need to bowl in a straight line and hit as many pins as possible to win? Yup, that’s the same for your user onboarding process.
A successful onboarding process requires you to map out everything that brings your user from point A (their current state) to point B (their desired outcome). The best way to do this is to create checkpoints throughout your onboarding process that drive users deeper into your product feature by feature.
This means that the goal isn’t for users to adopt all the features your product offers right from the start – but for them to adopt the most critical ones to solve their problems. After that, you can guide them to deeper usage as they gradually become power users.
One mistake some companies make is they overwhelm new users with all the features their tool offers instead of leading users step-by-step in a simple, logical funnel.
Key point: Identify your AHA moment (the moment your user realizes the value of using your product). Your user’s AHA moment could come in different ways. Here are some examples:
- Realizing how easy it is to integrate with your product successfully.
- Knowing how easily they can create & share professional designs in a few clicks.
- Realizing how quickly they can batch-create their copy & content using your product.
Make sure to gather qualitative feedback from your users and reiterate often to improve your onboarding experience wherever you can and to build on your product’s AHA moment better.
Pro-tip: Create a new account and use your product as any user would. Rate your overall experience, record the time it took you to onboard new users and analyze which aspects can be improved, minimized, or even removed.
The Product Bumper
The aim of this bumper is to create prompts within the onboarding process that guide the user on using your product’s features.
We’ll briefly review each feature you can include for creating a conversion-centric product bumper.
- Welcome Messages: Create a heartwarming message for your users when they onboard. Make it more than just a ‘hello’.
- Product Tours: These are in-app tutorials to guide users through aspects of your product.
- Progress Bars: Adding number-based trackers (i.e., 20% completed) motivates users to complete their onboarding process.
- Checklists: Breaking down your onboarding process into bite-sized action steps can help the user to complete important set-up tasks.
- Onboarding Tooltips: These are targeted tiny popups that throw more light on a specific feature.
- Empty States: An empty dashboard that has nothing but primary actions for the user to take to start your onboarding journey
The Conversational Bumper
As the name suggests, a solid conversational bumper will keep your users in the loop, have them engaged with your products, and talk to them via email or in-app messages.
A successful conversational bumper focuses more on which channels you want to use to communicate with your users.
A conversational bumper has multiple aspects to it, but not all are related to a product-led onboarding strategy (in reference to the bowling alley figure above). A product-led onboarding strategy aims to prioritize self-service and minimize human interaction, so limiting the channels through which we interact with users is important.
Try to focus on these aspects for your product-led onboarding strategy:
- User Onboarding Emails
- In-app Messages
- Customer Success Outreach (for users who might be fit for enterprise plans)
For your onboarding email strategy, make sure to follow this checklist in terms of what content you should include:
✅ A warm welcome to your product
✅ Free valuable resources to get them started
✅ Showcase social proof & the benefits of using your product
While there isn’t a fixed number of emails you should send, 4-5 emails is a good range for your overall user onboarding sequence. The number and content of your email depends on the user’s behavior (i.e., are they opening your emails? Are they clicking the call-to-action buttons?)
A common onboarding email SaaS companies send to their users is the ‘re-engagement’ email. This strategy can help to remind users about your product in case they haven’t used it for a while.
Onboarding Re-engagement Email Example: Eversign
You can use this example by Eversign to inspire your onboarding email sequence. You can get in touch with your user much better and connect with them emotionally this way.😁
Here are a few things we found interesting:
- Emotional hook to get them to open the mail.
- Personalization by using the user’s first name.
- Assurance that they’re here to help (24/7 support offer).
- Noticing the user’s inactivity.
- Different options to help the user come back to the product.

You can use this information to create an onboarding process that suits your product best.
Again, there’s no single, perfect approach to the Bowling Alley Framework. You just need to include all these aspects to create the best onboarding process for your users.
Conclusion
Congrats, you’ve gone through the whole product-led onboarding process from strategy & user activation to user retention & performance tracking.
There are no hard and fast rules for executing a successful onboarding process. Some tactics will work, and others might fail. Test out different strategies that are specific to your SaaS goals and reiterate as you go.
Good luck!