Customer Journey Mapping: A Simpler Onboarding Framework

TL;DR
- A customer onboarding journey map visually represents the customer’s first few experiences with a product.
- Mapping can be used to pinpoint friction points that hamper your customer’s onboarding journey and crush your activation rate.
- The onboarding journey can be broken down into milestones, such as the aha moment and key feature adoption.
- An effective customer journey map includes those critical milestones as well as the actions of the customer and communication touchpoints like sign-up forms.
- To boost your activation rate, design a “happy path” your customers can follow through your product.
Many SaaS businesses spend thousands of dollars every day to acquire more users. But most of those leads vanish before they even start using the product's main features.
The likely reason for this low activation rate is a poor onboarding process.
But onboarding is a complex process with lots of moving parts. So how do you identify where exactly the problem lies? The answer is: use customer onboarding journey maps.
These maps help you understand first-time users' needs, emotions, and concerns and they can help you boost your activation rate.
What is a customer onboarding journey map?
A customer onboarding journey map visually represents a customer’s experience when they first engage with your product. The map outlines the key milestones and actions customers take to get fully onboard and become regular product users.
This template contains the most common onboarding touchpoints for a new SaaS user.

Benefits of SaaS customer onboarding mapping.
Mapping out the onboarding process of new users helps you better understand how potential customers may interact with your product, what problems they could face, and what path you can direct them to so that they can get onboard swiftly.
This visualization tool makes it easier to optimize your onboarding experience based on real-world metrics.
Here are some benefits of using customer journey mapping to create a perfect onboarding experience:
It gets your team on the same page
The reason that smaller companies grow faster is that the team is aligned and hungry for customers. But as the company grows and different departments emerge, it becomes hard to align teams from all the departments on a single goal.
Creating a customer journey map reveals all the pain points and the happy path for your customers, giving your team a goal to work towards.
You can improve customer experience and drive retention.
By mapping out customer onboarding, you can identify any user experience issues in the process and eliminate them.
You can make the onboarding experience more user-friendly by simplifying steps, providing more guidance and resources, and ensuring all necessary information is easily accessible.
This drives retention by giving customers a smooth ride and highlighting the value of the product.
You can increase free-to-paid conversions.
Customers with a positive experience using a product are more likely to upgrade to a paid plan.
On the other hand, if the customer journey is not optimized, it can cause friction and make it more difficult for customers to move on to the next step.
You can implement proactive customer support.
Knowing where and when your customers get frustrated lets you build customer support at the most important junctures. For example, you can use your journey map to anticipate surges of use of certain features and keep your support team updated accordingly. Proactive customer success efforts make your brand appear reliable to your customers.
It’s not just about when to intervene with extra support. It’s also about how. Understanding the customer experience lets you offer the most appropriate kind of support for each situation. You can provide alternative options — like a chatbot or knowledge base — if users need to find a faster solution.
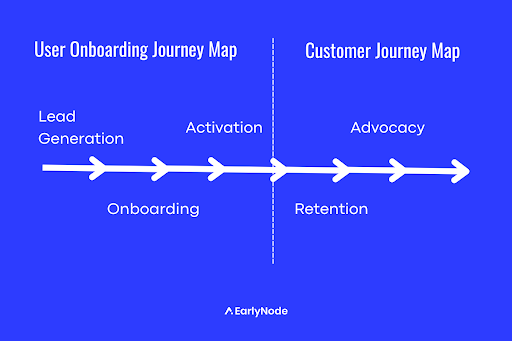
Customer journey map vs. user journey map?
You can do customer journey mapping for two groups of people. One is trial users, and the other is paying customers who are new to your product.
These two types of journey maps subtly differ from each other in terms of focus and objectives.
A user onboarding journey map is typically more focused on converting newly acquired users into paid customers. This map focuses on lead generation and onboarding and marketing efforts.
A customer journey map, on the other hand, is more focused on the post-sales experience. It ensures that new customers can effectively use, engage, and adopt the product. This map focuses on product tutorials, account setup, and the retention phase.
A user onboarding journey map continues upon a customer journey map. And there are many elements these two have in common.
5 essential components of a customer journey map
Representing a linear customer journey from point A to point B is tricky because customers can take many paths as they get to know your product. Think of it like a decision tree.
That’s why SaaS customer journey maps can quickly become complicated. There are too many touchpoints and details to be included, and it feels like an unsolvable puzzle if you take in all of them for one customer journey.

Keep it simple to ensure that the map makes sense to your team. Pare it back to these 5 important elements:
1. Customer Actions: This element describes what a customer will do in each stage of the onboarding process. They might visit your website, sign up for a trial, and then finally, they'll make their purchase.
2. Critical Milestones: Each of the customers' actions will take them to further stages of the onboarding process. Setting milestones is a good way to focus on optimizing each stage separately. We’re gonna talk about these in more detail in the next section.
3. Pain points: After setting up some milestones, it’s time to make it easy for your customers to achieve them. You can do this by eliminating pain points.Track where you’re losing customers in your onboarding journey; that’s where you’ll find the major pain points. These make your customers feel stuck and frustrated.
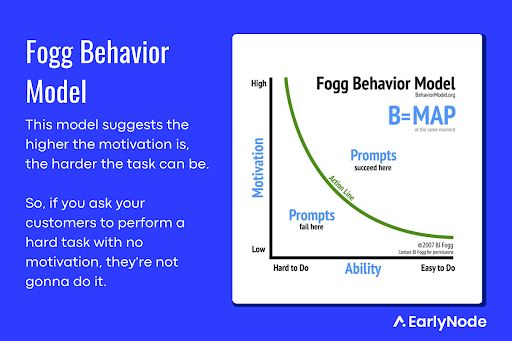
4. Emotions: Remember that your customers are trying to solve a problem. They probably feel some emotions at each stage — relief, excitement, or worry. And these emotions motivate them to take whatever action they’re taking.
Your goal is to redesign the user journey to get rid of these negative emotions at each stage. Because the more positive emotions your user experiences, the more energy they’ll put in to complete the onboarding. See the chart below…
5. Support Tools: Identify any existing solutions that you have in place to help improve the customer journey. Checklists, product walkthroughs, customer support channels, and educational content that showcases new features all fall into this category. Include these in your map so you can figure out how they’re impacting the customer journey.
7 steps to create a customer onboarding journey map
Now you know what a customer journey map is, what to include in your onboarding journey map, and how it can help your team to activate more users.
Let’s look at the process of creating an actual customer onboarding journey map.
Following are the 7 easy steps to use customer journey mapping to create a perfect onboarding process:
- Set clear objectives
Before starting the customer journey map, identify what your goals are for this map.For example, your goal might be to increase retention, or drive feature adoption, or increase activation rate. Setting a goal helps you focus on the most relevant milestones and come up with the most strategic intervention. Start by assessing what isn’t working e.g. low activation rate.
- Profile your personas
SaaS businesses generally have more than one kind of user. You can represent each user category as a persona that typifies who these people are and how they use your product. This requires you to immerse yourself in users’ minds and do some user research.
Think of a B2B SaaS product like Airtable. They say in one of their product guides, “Our customers use Airtable to do everything from tracking job interviews to managing large-scale video production, and thousands of companies use Airtable to run their most important business processes every day.”
With use cases like these, it’s almost impossible to cater to all of them with a single onboarding journey. That’s why it’s important to create distinct user profiles for your product's end-users and those who make the purchase decision and onboard each of them according to their goals.
By profiling 1-2 relevant personas and defining their goals, you can ensure that your customer journey map is tailored to these customers' specific needs and preferences – helping to increase engagement, retention, and satisfaction.
- Research pain points
The next step is to find out where in the process your customers are currently facing problems.
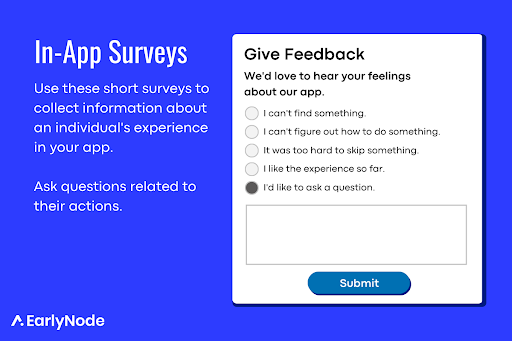
You can identify pain points by talking to current customers and conducting in-app surveys – asking if they feel off about something. If they show negative emotions toward a step in your onboarding process, mark that step as a friction point in your onboarding map.
You can also identify where in the process new users usually drop out of your app, as there might be a step that is too difficult relative to the motivation the user has to complete the step.
Also, if most of your customers are seeking help at a specific stage. There’s a high chance that you’ve got a friction point on your hands.
By identifying the customer pain points and challenges in the onboarding mapping, it'll be easy for you to create a happy path for your customers to follow in their onboarding experience.
- List all the customer touchpoints
Touchpoints are all the interactions between your customer and your app. Understanding these interactions allows you to offer the right help at the right time and in the most appropriate way.
These are the common touchpoints to list out in a customer onboarding journey map:
Sign-up flows
Your sign-up flow is often the first interaction between your app and potential users. Make it easy for them to quickly progress to the next stage in their journey. A simple sign-up form, a quick way to verify their email address, and a simple account setup are perfect ways to start your relationship with new customers.
Welcome emails
You can boost your business-customer relationship with a short and sweet welcome email, delivered right after sign-up. Include essential information on how to get started with the platform.
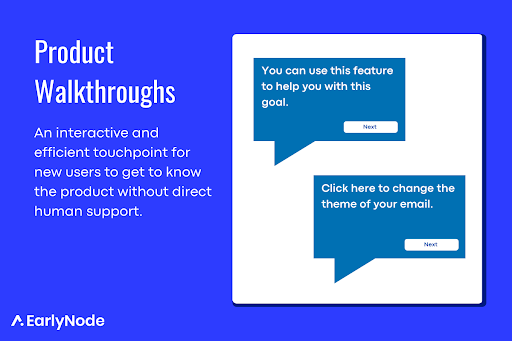
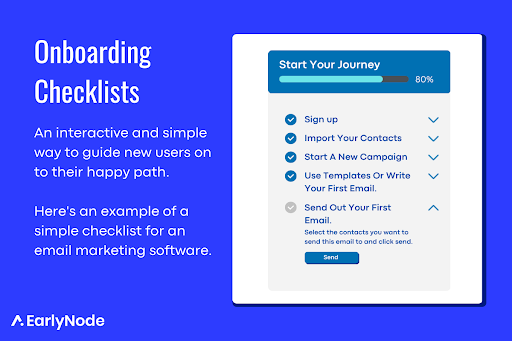
Product walkthroughs & checklists
It's important to provide your new users with a clear and concise onboarding experience. This is where product walkthroughs and onboarding checklists come in. Checklists guide users through the onboarding process and to the activation milestone with a series of “Aha moments.” These elements help customers understand how to use your product effectively to extract more value.
Customer support and success
Most customers resolve their issues by themselves. However, when your customer does need to interact with the customer success team, make sure that they are quick to solve the customer’s problems. Live chatbots and a help center or knowledge base are also good ways to support your customers.
Go the extra mile and offer proactive assistance. If a customer seems stuck in their journey but has not asked for support, your customer success team can jump in to resolve any issues they’re having or motivate them to move onto the next step.
Ongoing engagement
Although customer onboarding ends after activation, it's good to keep engaging and educating users on how to get the most out of your SaaS.
Send regular emails, and host webinars to keep new users engaged and old users up-to-date with new features. Product-led content, if well-researched and optimized, can also help with onboarding, product marketing, and building credibility.
- Map key milestones
This is where you break down the whole user journey into manageable chunks by identifying key moments. You have to treat each milestone like its own customer journey and prepare a mini-map for each of them. Some milestones to consider:
Aha moment
The "aha moment" is the first milestone in a new user’s journey to becoming a pro with your product. This is the moment when users realize how the product benefits their specific needs. The ‘aha’ propels them to continue using the product and invest more time in learning how to use it.
Activation
This is where a new user starts taking meaningful actions within the product, such as setting up their profile, creating projects, or sending out emails. This is an important milestone as it signifies that the user is engaged with the product and actively using it.
Key feature adoption
This milestone is achieved when a new user starts using your most important features. At this point, they’re enjoying about 80% of your product’s value. Adoption can include things like setting up a workflow or using integrations.
Retention
The retention milestone is achieved if a freemium user continues to use the product and its key features or if a paying customer keeps paying. To calculate retention, you can measure the number of active users or the duration of the user's subscription.
- Test your onboarding journey.
Creating the map is really just the first step. Once you’ve created a visual representation of the user journey, it’s time to use that insight to come up with solutions.
Take a look at all the pain points on your map and the places where touchpoints are failing or missing. Design solutions – like alterations to the UX or a new customer service channel – and test to see if they do what you think they do.
Refer back to your original goals to decide what to test for. Do your changes decrease the number of customers who leave before signing up? Are customers better supported? Are they feeling more positive emotions? These are some of the questions you can answer with testing.
Here is a structured approach to testing your upgraded onboarding journey:
Identify your test audience
You shouldn’t test your onboarding journey with every new customer. This can go badly if your onboarding process is not up to scratch right away (it happens). Before rolling it out to the wider audience, set a percentage of incoming users to test your new onboarding process.
Track their progress
As users progress through the onboarding journey, track their progress and note any issues or confusion they encounter. This is where you find out if your upgrades have removed all the old pain points. You can also conduct interviews and surveys after the testing to collect individual experiences.
Iterate and improve
It's time to use the feedback to iterate and improve the onboarding journey before rolling it out to a wider audience. Pinpoint all the friction points beta users face and A/B test potential fixes.
Roll it out
If you’ve designed a winning new journey, roll it out to a wider audience. But your job isn’t done. This is an ongoing process.
Metrics to monitor
Keep monitoring the onboarding process over time so you can keep improving. Track key metrics according to your goals.
- The happy path
When we talk about a path, we’re talking about the chronological order in which users do different tasks as they navigate your app.
A happy path is a specific path your customers take to achieve their goals without encountering any sort of friction or pain points in their entire onboarding journey.
You may have heard of something similar called a golden path. The difference between these two is that the happy path is focused on a specific stage of the product – say, onboarding – while the golden path focuses on optimizing the entire product experience.
Once you know your customers’ happy path, you can direct them toward this path if they get sidetracked. Use all the different touchpoints we’ve explored, including checklists, to achieve this.
Customer Onboarding Example – Uber
We all know Uber. It’s a fast, easy, and reliable way to commute. So, let’s wrap up by taking a look at a customer onboarding map from Uber (hopefully you’ll give us five stars at the end 😉).
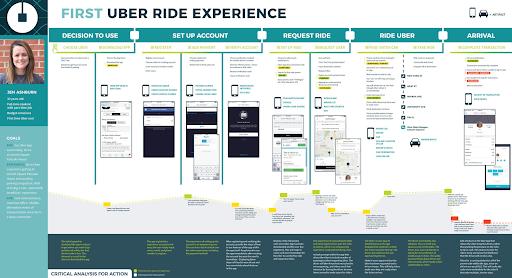
The purpose: Uber is a ride-sharing service that lets you book a ride of your choice on your mobile phone.
The promise: Stress-free and easier commute.
The target persona for this map: Heavy commuters who either don’t like driving and parking hassle or don’t have a car. They also avoid public transport. They could be from any walk of life.
How activation is measured: Uber’s definition of activation is somebody booking and completing a 5-star ride using Uber’s app.
Let’s break down the process.
Step 1: Decision
To attract potential users, Uber offers a promo. Your first ride with Uber will be free. You can experience it and then decide if you want to continue using it.
Here Uber tackles the nervousness of first-time experience with a simple and straightforward promotion. It’s an easier decision than paying for your first ride and trying things out.
Step 2: Setup Account
Uber’s account setup is a bit of a long process, but at this point, the customer is invested in getting that free ride and moving on to get ready for where they’re headed to.
This motivation keeps their energy high, and they complete the account setup quickly.
Step 3: Ride Request
Uber provides riders with many things to control, like what kind of vehicle or driver options, and that can be a bit overwhelming for first-time users. But Uber’s smooth user experience flow gets rid of this friction.
From applying free-ride promo codes to adding destination and pick-up locations, Uber ensures that users know exactly what to do by adding clear tooltips or call-to-actions.
The user picks their ride choice, and Uber shows the driver’s vehicle details and the time it will take for them to reach the pick-up location. This also gives riders a positive experience and relief from uncertainty.
Uber also uses the stars system to evaluate a driver’s profile based on the stars given by their previous rides. It is shown so that users can choose a driver that other riders had a good experience with.
Step 4: The Ride – Excitement
The driver calls to ask for the exact pick-up location. The rider reaches the pick-up location, and the ride begins.
Step 5: Arrival – Activation
Rider arrives at their destination, the transaction successfully completed, and Uber has fulfilled their promise.
There was no cash hassle or waiting for the payment to go through.
A stress-free, fast, and convenient ride.
That’s a map, folks
Once you fully understand where to direct your customer throughout their onboarding experience, you can delight them at every stage and drive deep adoption.
Hopefully, you can now build and implement your own journey maps to provide the best possible onboarding experience to your customers. Here’s a final reminder of the core elements of an effective customer journey map:
- Critical milestones
- Customer actions
- Emotions
- Pain points
- Solutions
Au revoir!